Category Archives: Components

serial star

Serial Star, a 4 in 1 USB Serial and I2C Converter

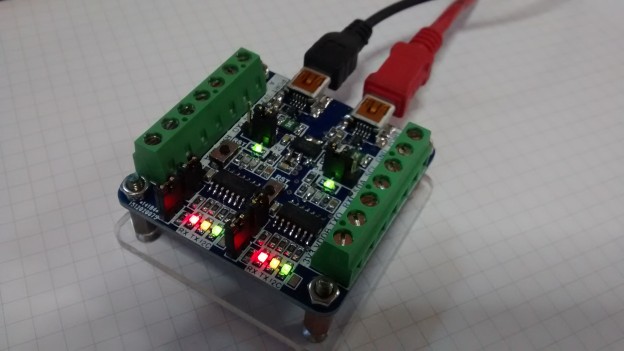
Hi all! Here’s one of the last board I design the last year. On 2016, I develop the Dual USB Serial and I2C Converter board. Although this board works fine, it has a couple of lacks. First one, is that to use the both converters, you need two free USB ports. Is a minor problem today with USB hubs, but you need the hub and also two USB wires. And the other problem is that this board uses mini-USB connectors. Of course today you can still find it, but aren’t as common as the micro-USB wires. For this two reasons, I decide to upgrade the board, add the micro – USB connector and put a USB hub inside it. Because I choose a 4-port USB hub, I use also 4 USB serial converters. With some addons, you can select power supply value (5V, 3V3), serial levels (TTL, RS232) and GPIO functions in an independent way for each converter. So, let’s see how works this USB Serial Star, a 4 in 1 USB to Serial and I2C Converter.
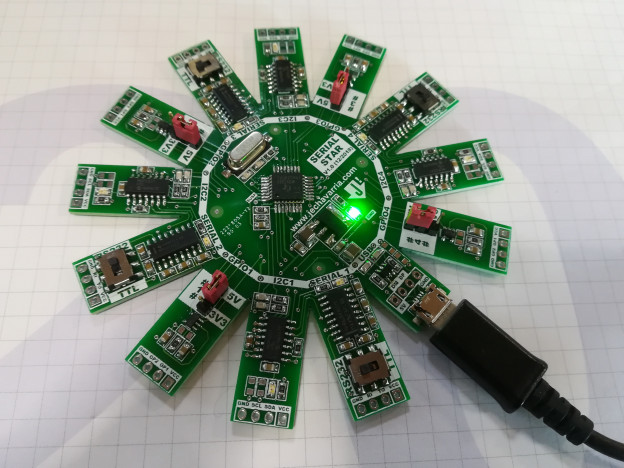
Continue reading

  • Twitter
  • del.icio.us
  • Digg
  • Facebook
  • Technorati
  • Reddit
  • Yahoo Buzz
  • StumbleUpon
MikroProg to Pickit 3 Adapter

Mikroprog to Pickit 3 adapter

Hi all! After a really busy months, I come back with a small tip. I start again work with PICs some years ago, and since then, I usually use the Pickit 3 programmer from Microchip. It’s a really great tool, with official support, online updates, and I never have a problem with it. But a couple of years ago, I discover the Mikroe products, both compiler for PIC and the programmer they have to program more tan 1000 PIC microcontrollers,  the Mikroprog programmerMikroProg to Pickit 3 adapter

Mikroprog is bigger in size than Pickit3, and comes with a flat 10-pin wire assemble inside the box, so you can’t remove this wire. Pickit 3 has 6-pin female connector just to plug it on the board header for programming.

Both devices has the same USB connector for PC management: USB mini:

Mikroprog to Pickit3 adapter

The problem with this two programmers is the programming connector. As you can see in the following image, both programmers has different connectors and pinout for programming:

MikroProg to Pickit 3 adapter

The pinout of the programmers are shown on the next image: on the left side, Pickit 3 pinout and on the right side, Mikroprog pinout:

MikroProg to Pickit 3 adapter

You can find more technical info about these programers here and here.

So, to use old boards thas has Pickit 3 header with Mikroprog programmer, you definitively need an adapter to have the signals on the same order. Is really simple to implement, just need to cross the signals. Here’s the schematic of the adapter:mikroprog to pickit3 adapter

With the connectors and a small piece of prototype board, it just take 10 mins to make it one:

MikroProg to Pickit 3 adapter

So, with this simple adapter you can use both programmers on boards that have a Pickit3 programming header.

  • Twitter
  • del.icio.us
  • Digg
  • Facebook
  • Technorati
  • Reddit
  • Yahoo Buzz
  • StumbleUpon
FONA808 PC Interface

FONA808 USB Interface

Hi! First of all, Happy New Year 2017! I hope all of yours starts the new year with good intentions. The mine one is write frequently here. Family and work don’t let me much free time but I’ll try it!

For several months I’m working with FONA808 modules from Adafruit to make a portable, web-based locating system. This modules are based on the SIM808 module from SIMCOM manufacturer, and integrates both GSM and GPS transceivers in one 24x24mm package.  The Adafruit board includes this module and also some electronics for choosing voltage levels, battery connection and charger. Because I need to test and programming some of this modules, I decide to make an specific PCB for it, allowing the programming and debugging via PC, wich is more comfortable that use a microcontroller for all these tasks. I use the MCP2221 USB-Serial bridge and add some electronics to give the board more functionality. So it has a connection for a 3.7Li-Ion battery, battery charger, manual pushbutton to turn on/off the module and also several led’s to indicate the status of the different elements and network connections. So, let’s go for it!

Continue reading

  • Twitter
  • del.icio.us
  • Digg
  • Facebook
  • Technorati
  • Reddit
  • Yahoo Buzz
  • StumbleUpon
MicroSD Adapter Teardown

MicroSD adapter teardown

UPDATE: It seems that Adafruit’s people also like know how the things works!

Hi all! Yesterday I was at home and I’ve got on the table a MicroSD adapter. I know, and also imagine, that this kind of adapters are just a contact extension to fit the MicroSD contacts in the SD format. But I need to ‘confirm’ it, so I take the screwdriver to open it, and here’s the result:

MicroSD Adapter TeardownThis is the adapter that I’ll open and it never will be the same. Once is open, carefully for not break any part, I obtain the three parts that make up the adapter: two plastic covers and the contact extender.

MicroSD Adapter TeardownThe extender can be removed carefully from the back plastic, and has enough quality for this kind of piecesThe extender can be removed carefully from the back plastic, and has enough quality for this kind of pieces:

MicroSD Adapter TeardownOn the MicroSD part, the contacts are folded, and acts like a spring when the microSD is inserted on the adapter:

MicroSD Adapter TeardownWith this my curiosity is satisfied, at least until I find more things to open 😉

  • Twitter
  • del.icio.us
  • Digg
  • Facebook
  • Technorati
  • Reddit
  • Yahoo Buzz
  • StumbleUpon
Dual USB Converter

Dual USB Serial and I2C Converter

UPDATE: Some places where the project appears. Thanks to all!!

Hi all! After a couple of months with a lot of work, I come here again with the last board I develop before Christmas. It’s a dual USB serial and I2C converter based on two MCP2221 Microchip 2.0 USB-Serial bridges. I develop it as a need on my work with the last project I’m involved. I need to monitor a serial communication between two devices. With only one converter, I must choose between RX and TX lines to monitoring the traffic. With this solution, I can listen at the same time TX and RX lines, so the monitoring is more easy. And with a software like Docklight (you can download a free evaluation copy here), you can choose the monitoring option to display both channels. After the break you can find all the technical info of the board!

Continue reading

  • Twitter
  • del.icio.us
  • Digg
  • Facebook
  • Technorati
  • Reddit
  • Yahoo Buzz
  • StumbleUpon

Adding a USB power port to a switch for IoT

UPDATE: You can find a brief entry on Adafruit blog, thanks!!!

UPDATE: You can find this project on Instructables webpage: http://www.instructables.com/id/Add-a-USB-Power-Port-to-a-10100-Switch/

Hi all! After some time out, due some hard work, I’m here again with a ‘one weekend’ project (in my case, with three childs. Sure it can be done in one afternoon!). I want to start some projects with Arduino and IoT, so the first things I need is an Arduino board, an Ethernet shield and a switch to connect it to the net. Also I need a power supply for the Arduino board, and I think that, better than a external USB AC wall adaptor or power supply, is modify the switch to add it a USB power port that can power the Arduino board. I’ve got at home a TP-Link TL-SF1008D, a simple 8 port 10/100 Mbps switch. So, let’s go to open it and add it the USB port!

Continue reading

  • Twitter
  • del.icio.us
  • Digg
  • Facebook
  • Technorati
  • Reddit
  • Yahoo Buzz
  • StumbleUpon

SIM900 USB Communication using MCP2200

Hi all! Here’s the new project where I’m working a couple of days. Since I develop the SIM900 module and test it, I don’t work with it. Also, I’ve got at home some samples of the MCP2200 USB bridge that I want to test it. So make an USB interface for this board was the perfect idea! This allows to use the SIM900 board with a PC, Raspberry or similar, with the plus of no need external power supply or control signals. Just plug the USB cable on the board and start communicating with the world!

Continue reading

  • Twitter
  • del.icio.us
  • Digg
  • Facebook
  • Technorati
  • Reddit
  • Yahoo Buzz
  • StumbleUpon
PIC18F2550 breadboard

PICnano breadboard based on PIC18F2550

UPDATE: Thanks to Rando, now you can order this PCB on OSH Park. Thanks!!

UPDATE: If you’re interested in mount the board yourself, now you can download the Bill Of Materials (BOM). Happy welding!

Hi all! With a bit of delay, here’s my last work, a PICnano breadboard based on the PIC18F2550 microcontroller. I have in mind a new project and I want to use an small board, like the Arduino Nano board. This new project is battery powered (3,7V Li-Ion battery). After checking the schematics of the Arduino Nano, I see that the microcontroler is powered at 5V. Of course, I can unmount the linear regulator (U3) that is on the board, and bypass the VIN to the microcontroller power supply. But I think it’s funny try to develop a new module when you’ve access to the microcontroller power supply! Also, I want to work with PIC microcontrollers after many years, so here’s what I design!

Continue reading

  • Twitter
  • del.icio.us
  • Digg
  • Facebook
  • Technorati
  • Reddit
  • Yahoo Buzz
  • StumbleUpon

BeagleBone Black Board Dimensions

BB_OUTLINE

In the last months, I make some boards based on the BeagleBone Black board (three at this time!). In these projects, I only develop the hardware platform, the carrier board where it will be mounted. For the develop of this kind of boards, mechanical information provided by the manufacturer is very important, and enough in the most cases. In the case of the BeagleBone Black board, this info is included in the Reference Manual: BBB_SRM. But I don’t find some interesting distances that I need for my boards, so I take a board, I measure it and here are the results.

Continue reading

  • Twitter
  • del.icio.us
  • Digg
  • Facebook
  • Technorati
  • Reddit
  • Yahoo Buzz
  • StumbleUpon

DSETA board, a CPU based on the Atmel AT89C51RE2

DSETA CPU based on AT89C51RE2 ATMEL microcontroller

In my last projects, I always use the same CPU. DSETA board, I say in the posts. Well, here it is, a CPU based on the AT89C51RE2 microcontroller from Atmel. I develop this board for some reasons. The first and main one is because I want to have a small board with a great (an known) 8-bit microcontroller, ready to use and with many of the peripherals I usually use. The other reason is that I want to test the PCB service from Seeedstudio, a PCB manufacturer from Shenzhen, China. Here are the results. Continue reading

  • Twitter
  • del.icio.us
  • Digg
  • Facebook
  • Technorati
  • Reddit
  • Yahoo Buzz
  • StumbleUpon