
Here it is. This project starts four weeks ago, when my daughter shows running the Digital Paddle Clock that I receive from Dangerous Prototypes. She has four years old and she loves count. She can count up to 30 (more or less), but she doesn’t recognize high numbers when she sees written. So, I decide to make a counter with two 7-segment displays and increment a decrement pushbuttons, so she can count pressing buttons and see the numbers in the displays.
I make this project using an old PIC16F84A, for two questions. First of all, I use this microcontroller because I’ve a couple of it at home. And the other is because I want to start working (again) with PIC microcontrollers. I used in the past, but when I started working on my actual company, as they were not used, leave them forgotten.
Here’s a block diagram of the system:

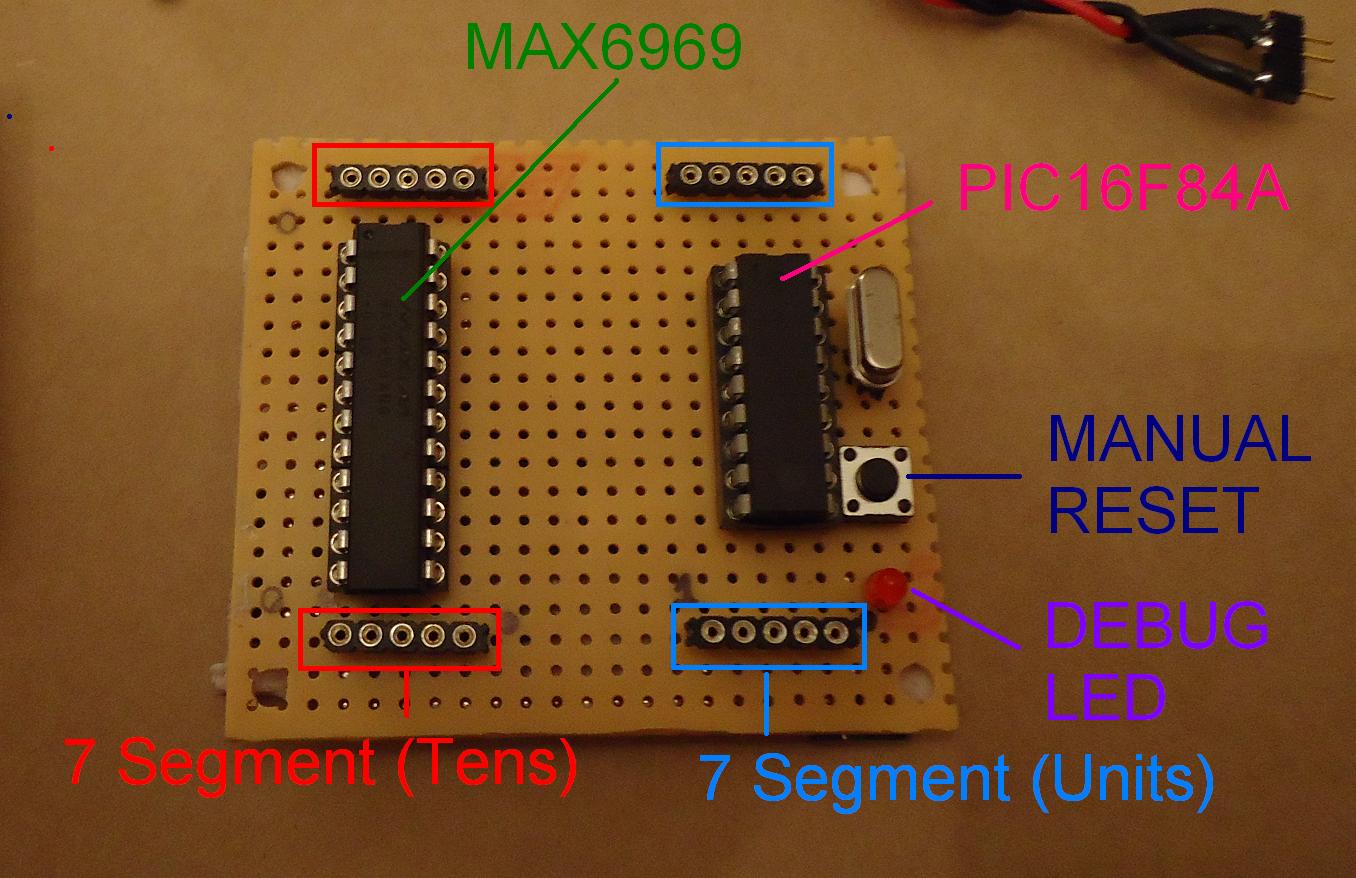
The system is so simple. It’s based on the PIC16F84A microcontroller and the MAX6969 led driver. The communication between these two devices is a standard shift-register-plus-latch-type serial interface. The microcontroller reads the pushbuttons and increment or decrement an internal variable. Then, the value of this variable is shown in the 7 segment displays through the MAX6969 driver. When you push both bottons at the same time, the count resets, and starts at ‘0’. In this case, there’s a beep (through the buzzer) that indicates the count is start again. The 7 segment displays are two TOS-15102BEG displays (sorry, I don’t find the datasheet). These displays are common-anode, and are bicolour (red and green). So I decide to put a switch to change the colour manually. Finally, the power supply is three AA batteries that give a working tension of 4.5V. I also put a switch to turn on or off the system.
- The Hardware
As I describe above, the hardware is simple. Here is the scheme of the board:

As I describe above, the hardware is simple. Here is the scheme of the board:
- Power Supply: Three 1,5V AA batteries, giving a working voltage of 4.5V.
- Microcontroller: PIC16F84A running at 4MHz. It includes a circuit reset with an external pushbutton.
- Inputs to the microcontroller are the two pushbuttons to increment and decrement the count. These signals (PUL_INC and PUL_DEC) go to RA2 and RA3 pins, and are active at low level (‘0’). It also includes a capacitor to minimize rebounds when you press it.
- To activate the buzzer, I use the RB4 pin as output. This pin is connected to the gate of a digital MOSFET (FDV301N). When is active (high level), the transistor is on and the buzzer beeps. I use this buzzer, it works fine despite it’s for a 3,3 volts.
- The interface with the MAX6969 is doing by four signals. RB0 is used to send the 16 bits to the driver (DIN). RB1 is CLK signal, to shift the data into the internal 16-bit register. RB2 pin is latch enable signal (LE), which loads the 16 bits of the shift register data into a 16-bit output latch. RB3 is used as an Output Enable signal that gates all the 16 outputs on and off. This can be used as a PWM input, to control the intensity of the led’s. I use in this way, but only for reduce consumption of the circuit.
- I also put a general led connected to RA4 pin, to debug the software.
- Led driver: I use the MAX6969 from the sample program of Maxim. This driver gives 16 constant-current led outputs with only one resistor. The interface with the microcontroller is explained above; it’s an industrial standard 4-wire serial interface. The output current is fixed with one resistor, Rset. To calculate it, you should use this formula: Rset = 18000 / Iout (mA). The minimum value is 327 ohms (55 mA per output). The maximum allowed value is 1K5, that means a output current of 12 mA per output. I use this maximum value of resistor because I don’t want a very high luminosity.
Here you can see the finish board:
7 Segment Counter for kids
Top Layer – Identify components

Top layer – Displays mounted

Bottom layer – Identify connectors

All the components, ready to assemble!

Assemby batteries, pushbuttons, switches and displays

Assemby control board. Ready to close!!
- The Software
I want to write the code in C, so I start search a C compiler for PIC. I find the official MPLAB and the MikroC Pro C Compiler for PIC. At the end, I use this last one, because is free for code less than 2KB. The IDE looks like simpler and clear that MPLAB, and libraries helps you a lot in the design. But it’s not perfect: you can simulate the code, but you can’t simulate interrupts automatically. I think this is a great disadvantage, and with this I lost a lot of time until I discover it.
Here you can download the full project in Mikro C. About this code, some tips to know:
- At power up, the system shows the number ‘0’. After config the IO ports and timer, it beeps indicating the system is ready.
- The infinite loop test both pushbuttons and shows the value in the displays. The right pushbutton is for increment the value, and the left one is for decrement. When the count reach 99, a press in the increment button has no effect, and the value of 99 remains. In the same way, when the value is 0, a press in the decrement button has no effect.
- If you push simultaneously both pushbuttons, the count resets and starts again in 0.
- Timer0 is config as a counter with active interrupt on overflow. This interrupt is used for two things: First is for generate the pwm signal to activate the displays, in order to extend the battery life. The other function is count for about 30 seconds. If in these time no pushbutton is pressed, then the displays turns off, also for save batteries. A press in any button turns on the displays, showing the last value.
Finally, you can see here a video of how it works, in the hands on my daugther 😉


Good tutorial ….liked it …thanks for sharing with us!